Purpose
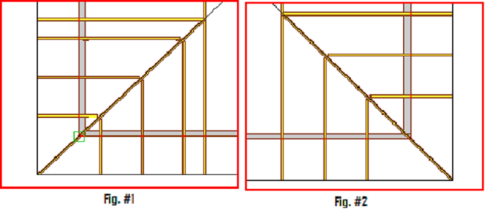
Create a complete corner including a Corner Girder or Rafter and graduated corner trusses.
Note: Some conditions for input of Hip Sets may require input of a mono hip with the corner set, hip girder, and jack trusses each input manually. It is recommended to first input the carrying truss girder prior to inputting the corner set.
Steps
To create a standard corner set:
 .
.The Corner Set Dialog displays.
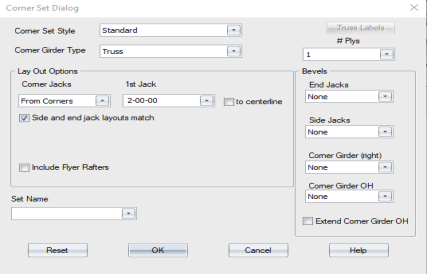
- Define the following options on the Corner Set Dialog:
Corner Set Style - select Standard from the drop down list.
Corner Girder Type - select Truss, Rafter, or Stacked Rafter.
Layout Options
Corner Jacks - select From Corners or To Corners. If you select From Corners, the 1st Jack option displays.
If you select the option for Side and end jack layouts match, you need to enter only one set of Corner and 1st Jack options. Otherwise, an additional field is displayed for the side jack.

Include Flyer Rafters - check this option to include flyer rafters in the corner set.
# Plys - specify the number of plies
Truss Labels - define preset labels. See Label Trusses - Preset Labels for information.
Bevels - select bevel options from the drop down lists.
Set Name - select a set name to add to the truss label prefix for trusses in a set.
- Click OK.
The prompt displays: Click to select ridge line for Corner Set.
- Click the ridgeline to indicate where to place the corner set.
You remain in truss input mode after trusses are added to the layout and can continue adding trusses, until you manually exit the command. Press Esc or right-click and select Cancel to exit.
- If you already know the settings defined on the Corner Set dialog, you do not need to open the dialog to place trusses. Press Shift and click the icon for the truss placement option you want to use. Truss Studio automatically opens the layout in truss input mode, bypassing the dialog box.
- If you want to repeat the last truss placement, click
 or select Truss Placement > Next Truss > Repeat Last Placement.
Undo Options
- While the command is enabled, using Undo reverses the previous step.
- Using Undo during a multi-step command undoes one step at a time.
- Undoing past the first step in a multi-step command exits the command and undoes the last block.
- Outside of a multi-step command, Undo will undo a block at a time.
- Esc or Cancel ends the command and undoes any partially completed blocks in the script.